YouTube End Screen Tips To Hook Clicks And Grow Fast in 2026
One of the biggest reasons channels struggle to grow is because viewers simply don’t stay long enough or take the next step. You might have great content, but if people drop off at the end or don’t know what to watch next, your engagement slows down. And when engagement slows down, your reach and growth slow down too. It’s frustrating because you’re putting in the effort, yet the results don’t match the work.
The good news is there’s a simple, strategic solution: optimizing your videos with powerful end screens. When you guide viewers toward the right next video, playlist, or action, you can easily 10X your engagement and keep people inside your content for much longer. A smart end screen turns one view into multiple views, boosts your watch time, and helps your channel grow way faster with the same amount of effort.
What Is End Screen In YouTube?
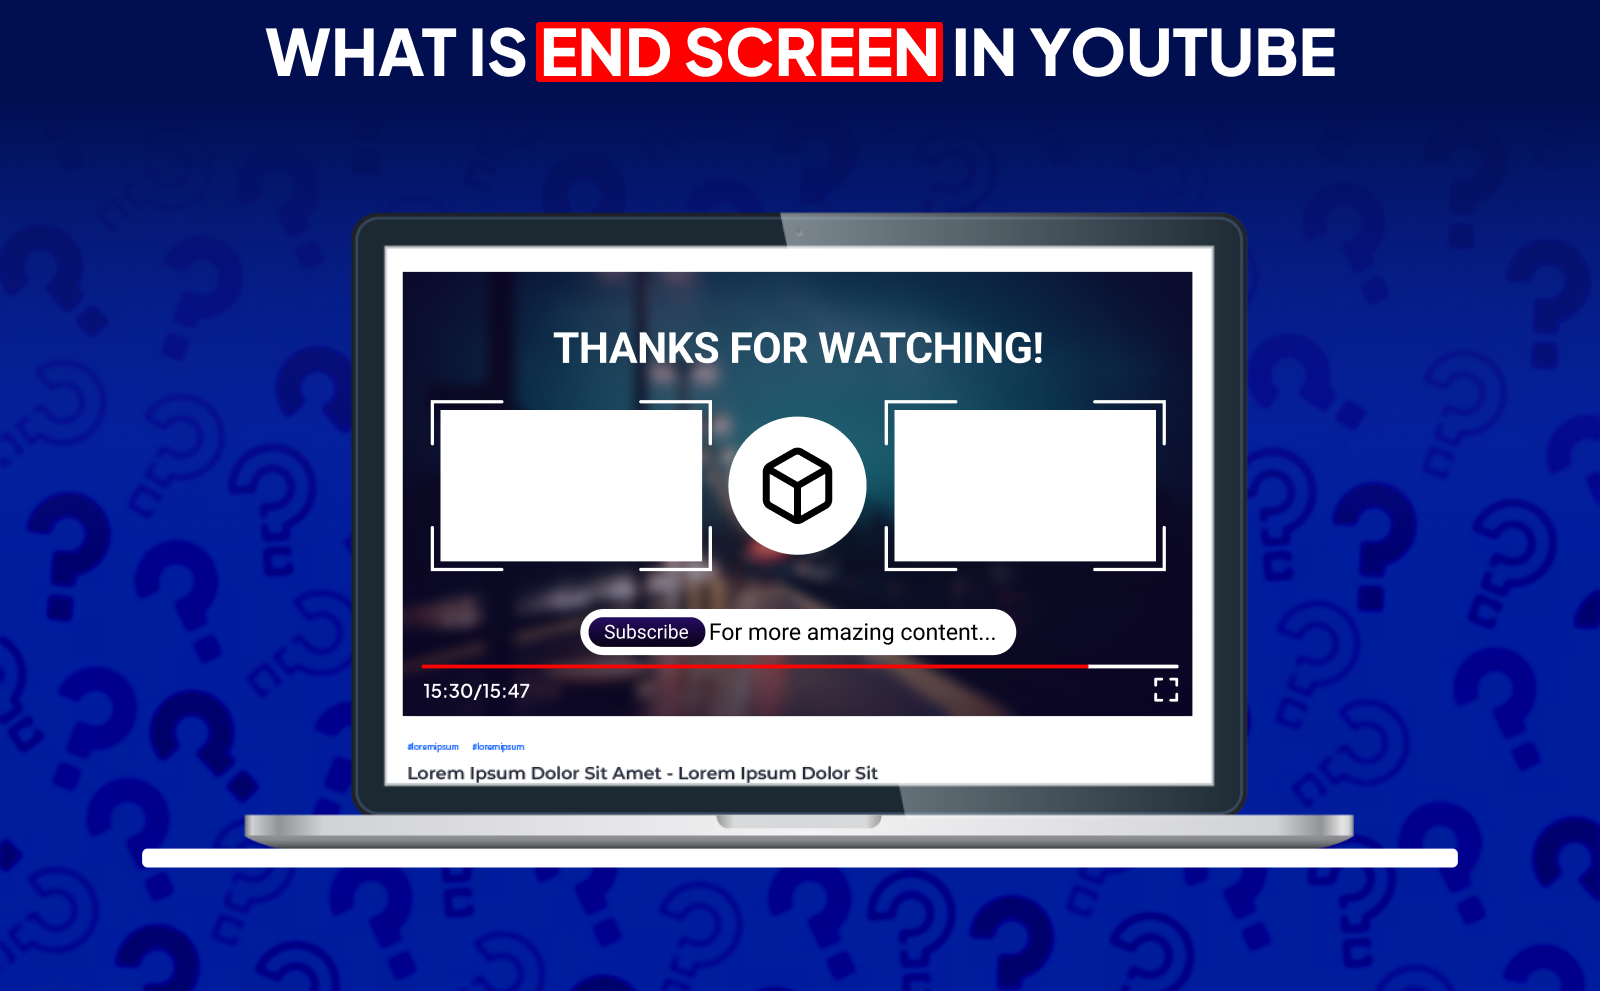
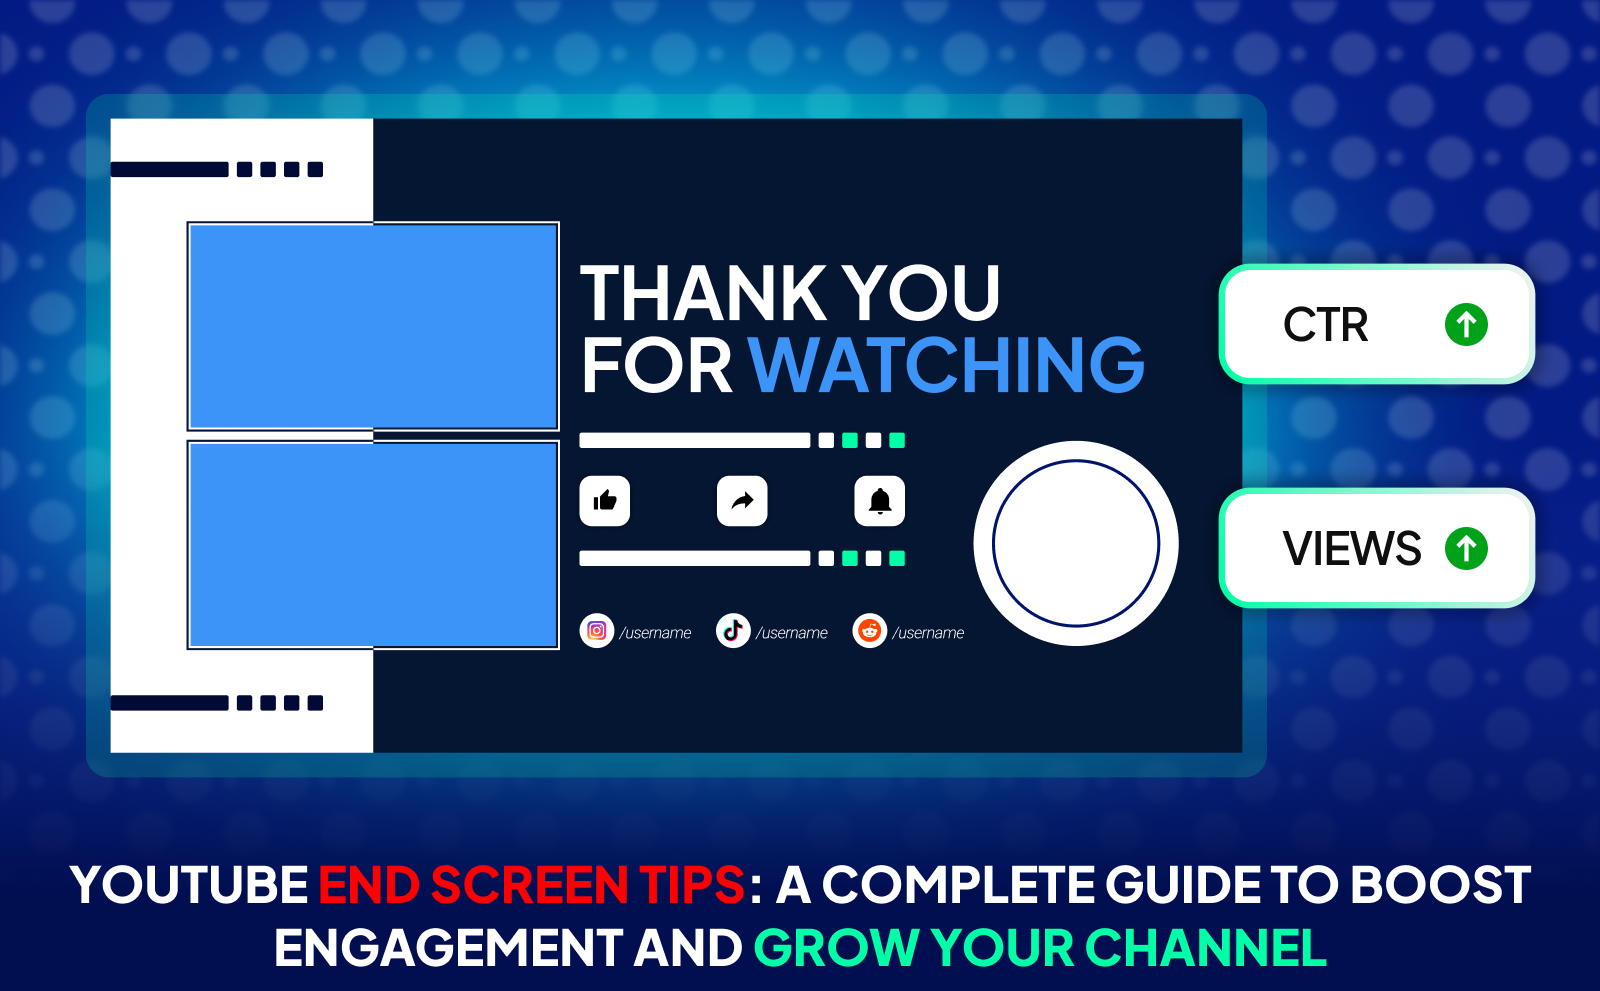
An end screen is the final section of your YouTube video that appears in the last 5–20 seconds. It’s the part where creators usually show clickable elements like “Subscribe,” recommended videos, playlists, or even links to channels. Think of it as a clean outro that keeps viewers engaged even after the main content is done. Instead of letting them click away, the end screen guides them toward what you want them to do next.
The main goal of an end screen is to turn your viewers’ attention into action. When someone finishes your video, they’re at peak interest, and that’s the perfect moment to push them to watch more content or subscribe. A good end screen helps prevent viewers from dropping off and increases your channel’s watch time, which YouTube loves. So, it’s way more than a cosmetic element… it’s a growth tool.
Understanding YouTube End Screens And Their Purpose
YouTube end screens exist to keep people inside your content ecosystem for as long as possible. When someone clicks on the next video you recommend, it signals to YouTube that your channel keeps viewers engaged. More engagement means better recommendations, more reach, and ultimately more growth. So an end screen is basically the bridge between one video and the next. a way to keep your audience hooked without forcing anything.
Their purpose isn’t just about watch time though. End screens also help direct viewers toward specific goals: subscribing, signing up to your newsletter, watching a high-converting video, or checking out a full playlist. Instead of hoping viewers figure out where to go next, you guide them clearly. This makes your channel look organized, intentional, and more professional, even if you’re just starting out.
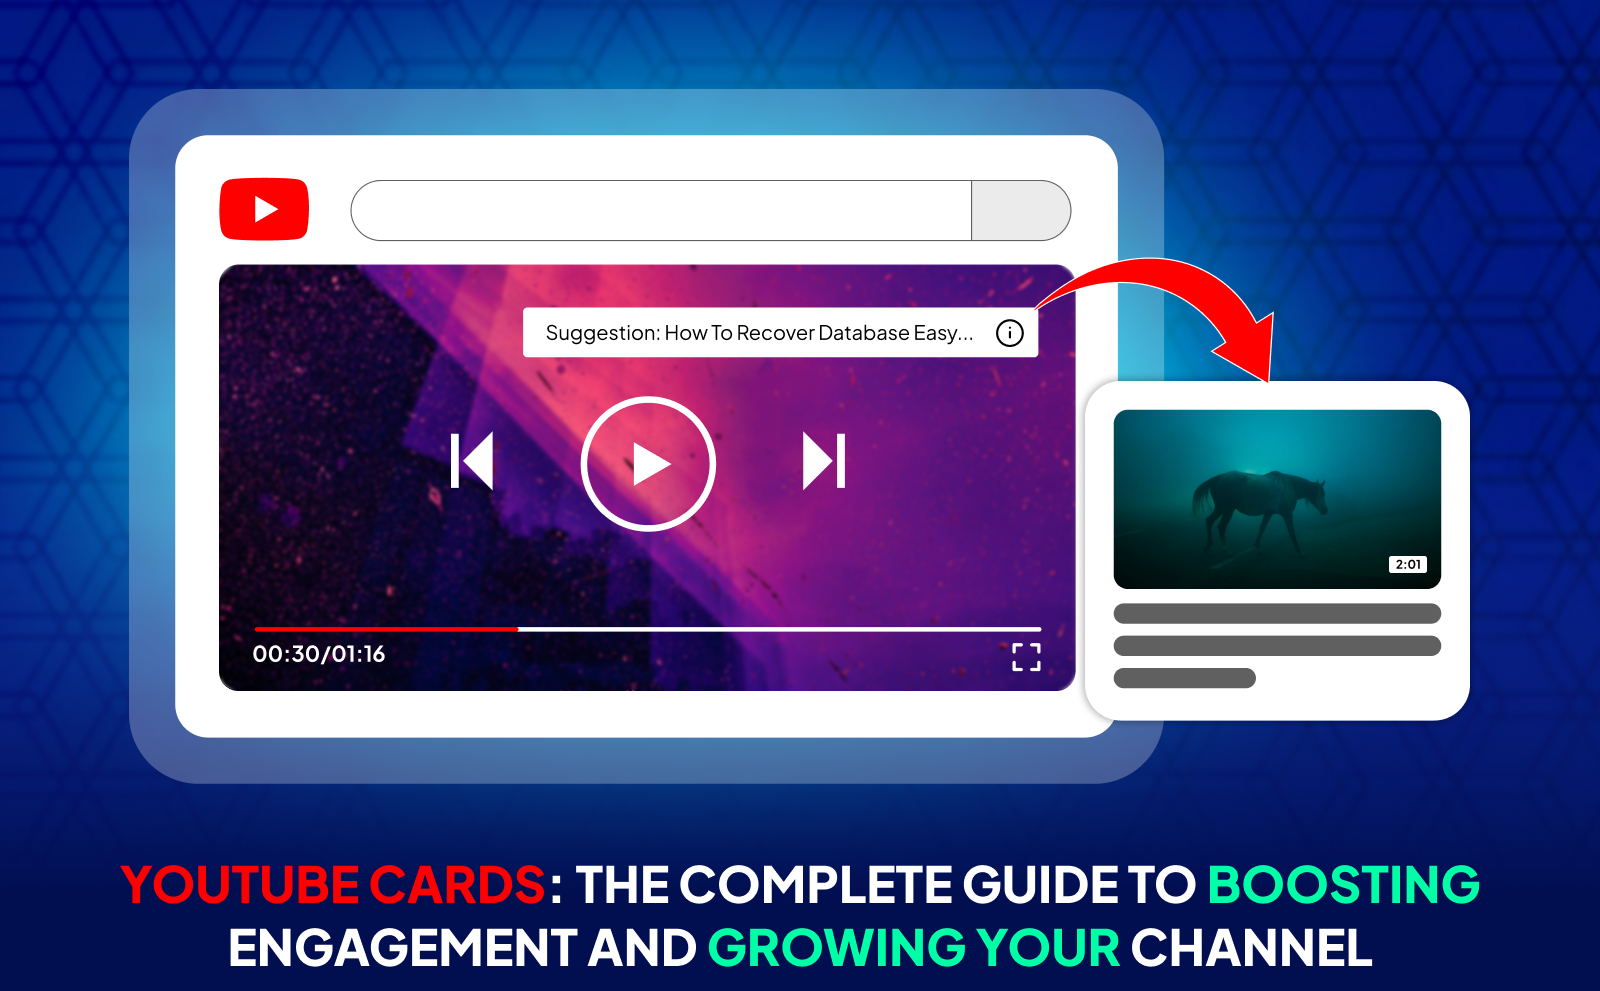
How YouTube End Screens Differ From Cards?
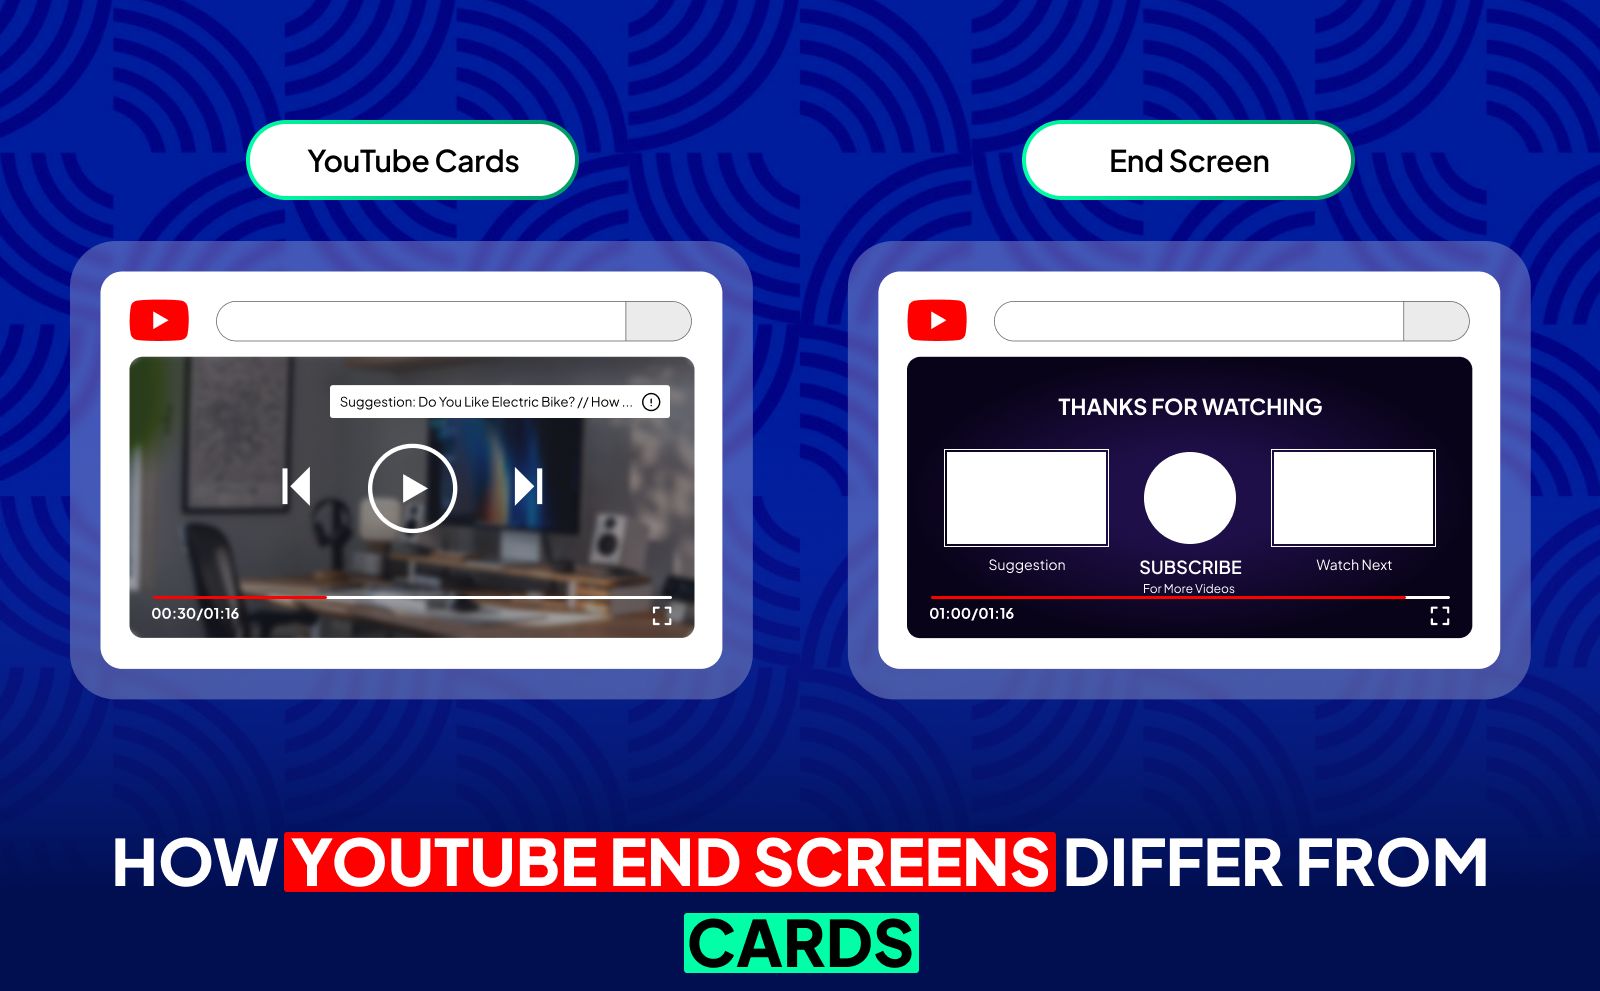
Cards pop up during the video, right in the middle of your content, while end screens show up only at the end. Cards are great for quick suggestions or linking to something you mention in the moment. End screens, on the other hand, are meant to keep viewers watching after the video is over. They’re less intrusive and feel more natural since they don’t interrupt anything.
Another big difference is how viewers interact with them. Cards often get ignored because people are focused on watching, but end screens appear when viewers are ready to decide what to do next. This makes them more effective for pushing longer session times. Cards are for supporting your content. End screens are for guiding people to your next move.
Key Components Of An Effective YouTube Ending Screen
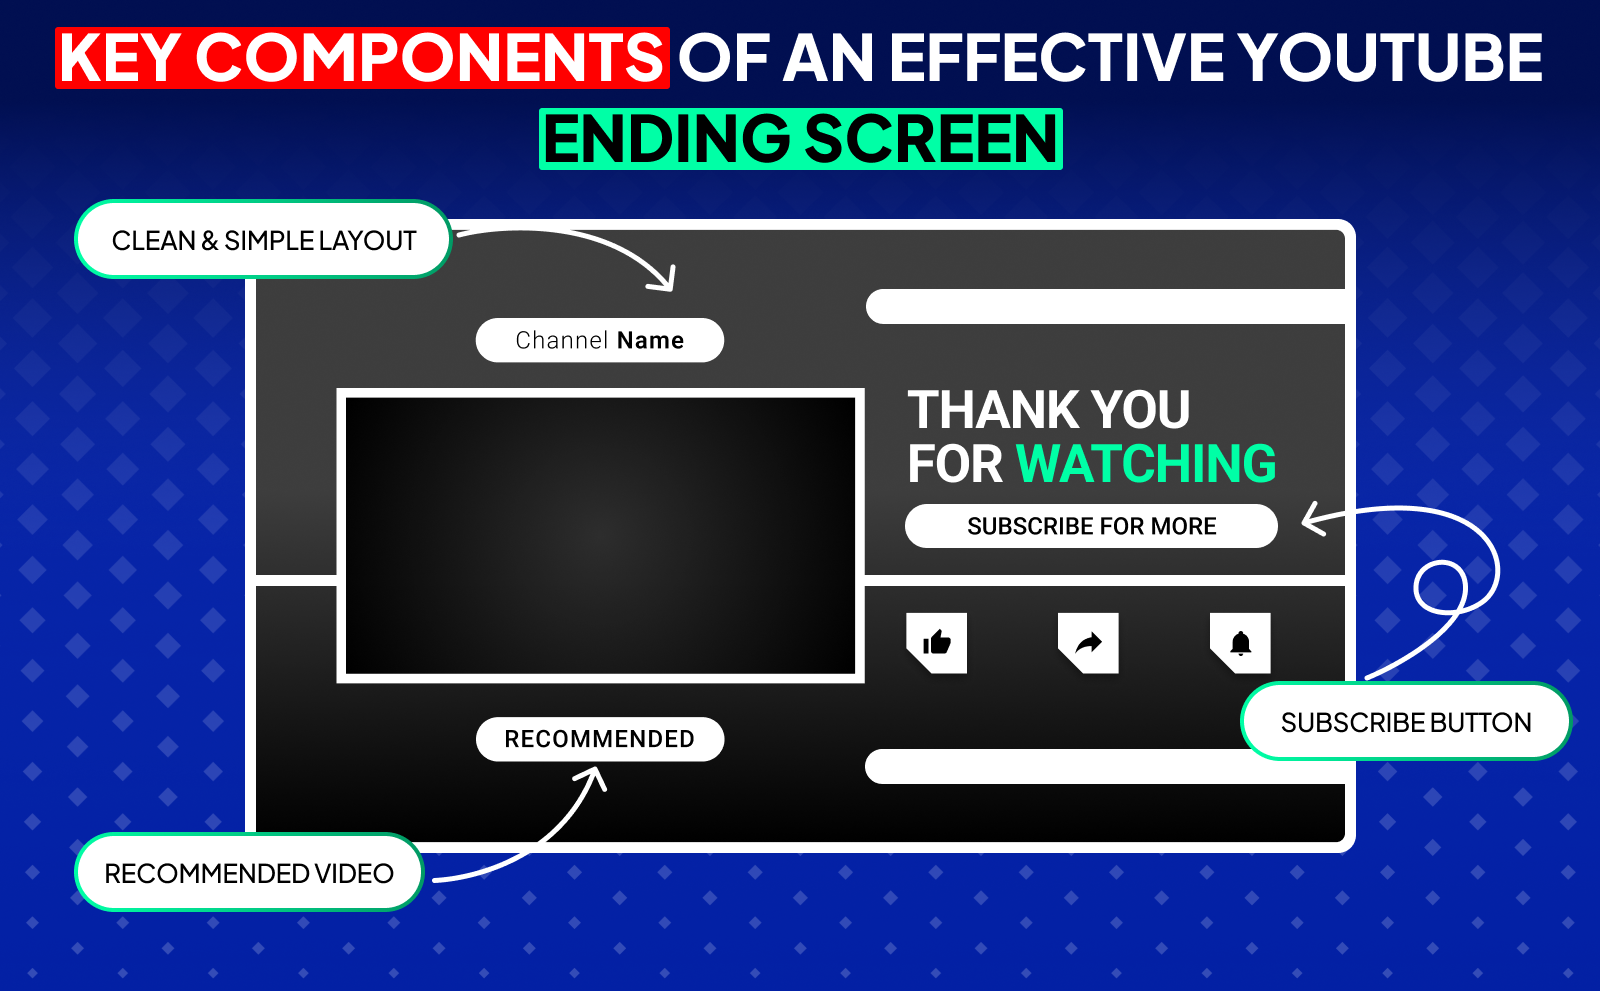
A strong end screen usually includes at least one recommended video or playlist, a subscribe button, and a clean layout that doesn’t overwhelm the viewer. The design should match your channel’s style. simple, easy to read, and placed in spots that don’t cover important visuals. If your end screen looks messy or confusing, viewers will just click off.
But the real magic is in how you use it. An effective end screen should be paired with a smooth outro where you verbally guide viewers: “If you want to learn more, watch this next.” Give them a reason to click, and make the transition feel natural. You can even design your last few seconds with space on the screen for the clickable elements. When everything fits together: your video, your voice, your layout, your end screen becomes a powerful tool to boost watch time and grow your channel faster.
How Long Is YouTube End Screen And Timing Best Practices?
A YouTube end screen can last anywhere from 5 to 20 seconds. Most creators don’t use the full 20 seconds, but having that flexibility helps you build an outro that fits your style. The key is making sure your end screen doesn’t feel rushed. If it’s too short, viewers won’t have enough time to click anything. If it’s too long, they may click off before it even appears. Finding that middle ground is what makes your end screen actually work.
A good timing practice is to design your video so the last 10–15 seconds feel like a natural wrap-up. This way, your end screen doesn’t suddenly jump out of nowhere. You can use this moment to talk to the viewer, briefly summarize your point, and lead them toward the next video. When your timing feels smooth and intentional, people are more likely to stay till the end and interact with whatever you show them.
YouTube End Screen Length Requirements
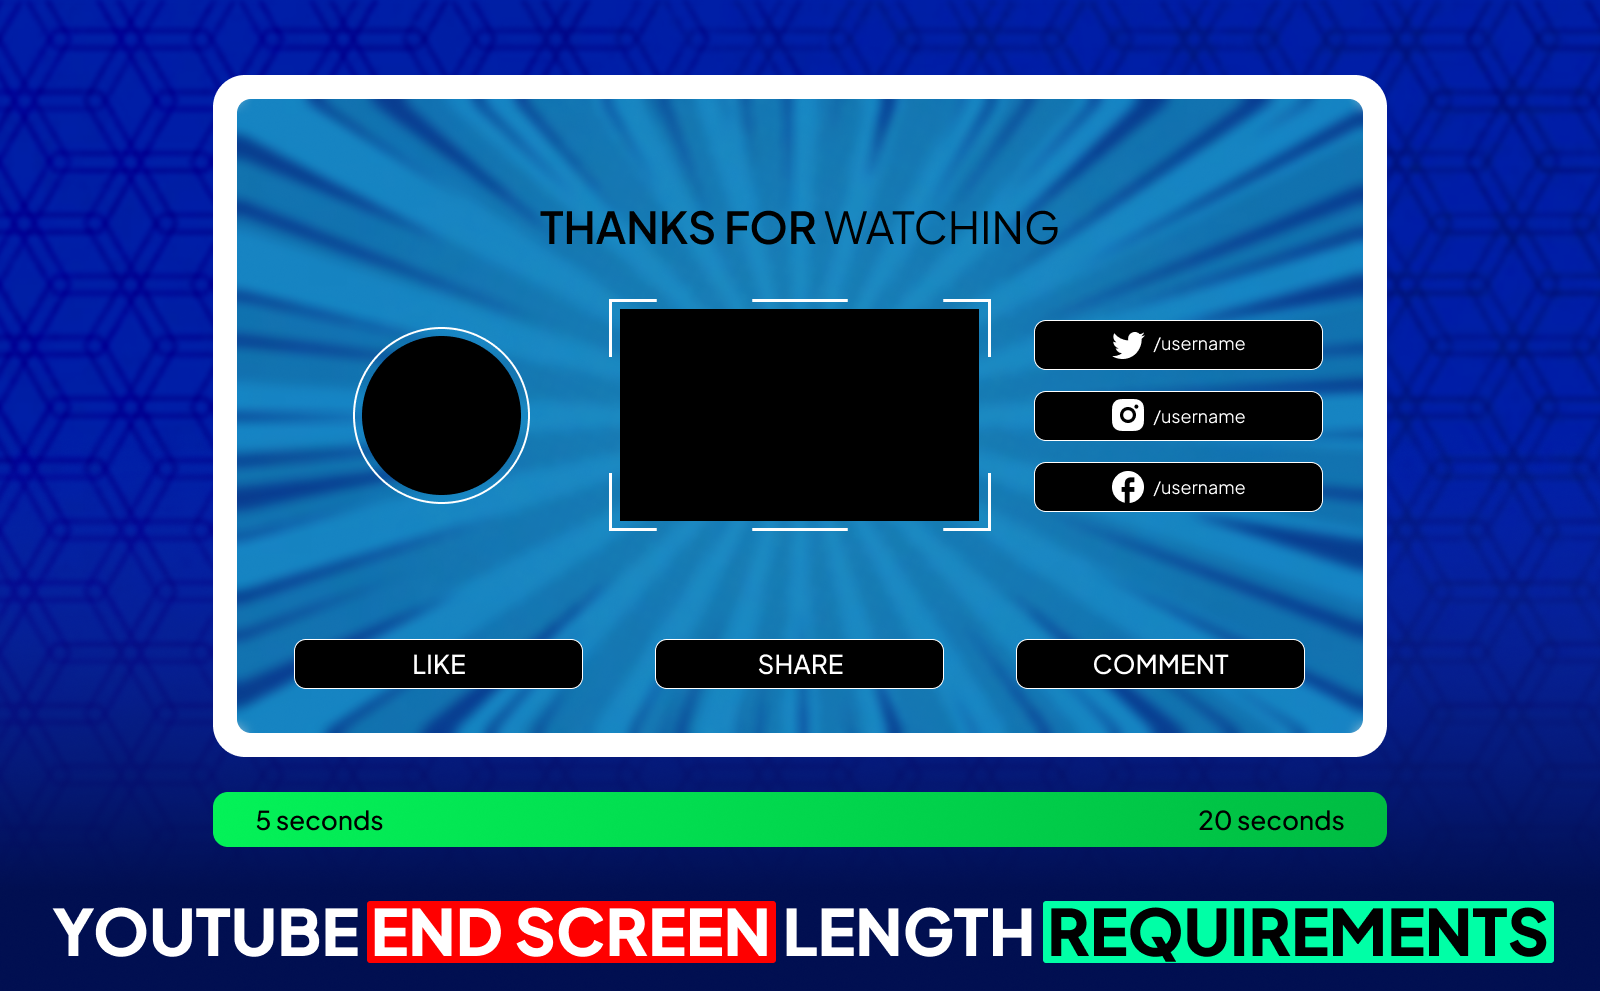
YouTube requires your end screen to be at least 5 seconds long and no longer than 20 seconds. You can place it anywhere inside that final 20-second window. This gives you room to plan your outro in a way that doesn’t feel forced. As long as you stay within the platform’s rules, you can style it however you want. fast-paced, slow and clear, or anything in between.
What matters most is that everything is visible and clickable. If your end screen is too short or badly placed, viewers won’t have time to act. Sticking to YouTube’s length requirements makes sure your elements render properly on both mobile and desktop. So even though the rules are simple, the way you use that time matters a lot for your performance.
How Long Should YouTube End Screen Be For Maximum Impact?
The sweet spot for most channels is around 10 to 15 seconds. This gives viewers enough time to process your recommendations without dragging the outro. In this window, people are still paying attention and deciding if they want to keep watching. It’s long enough to encourage click-through rates but short enough to avoid boredom.
The trick is using these seconds wisely. Keep talking or keep something visually interesting happening on screen so viewers don’t click away early. And make sure your recommended videos match what they just watched. When the content flows naturally, your end screen feels like a helpful suggestion instead of a hard push, which leads to more clicks.
Optimal YouTube Video End Time Placement
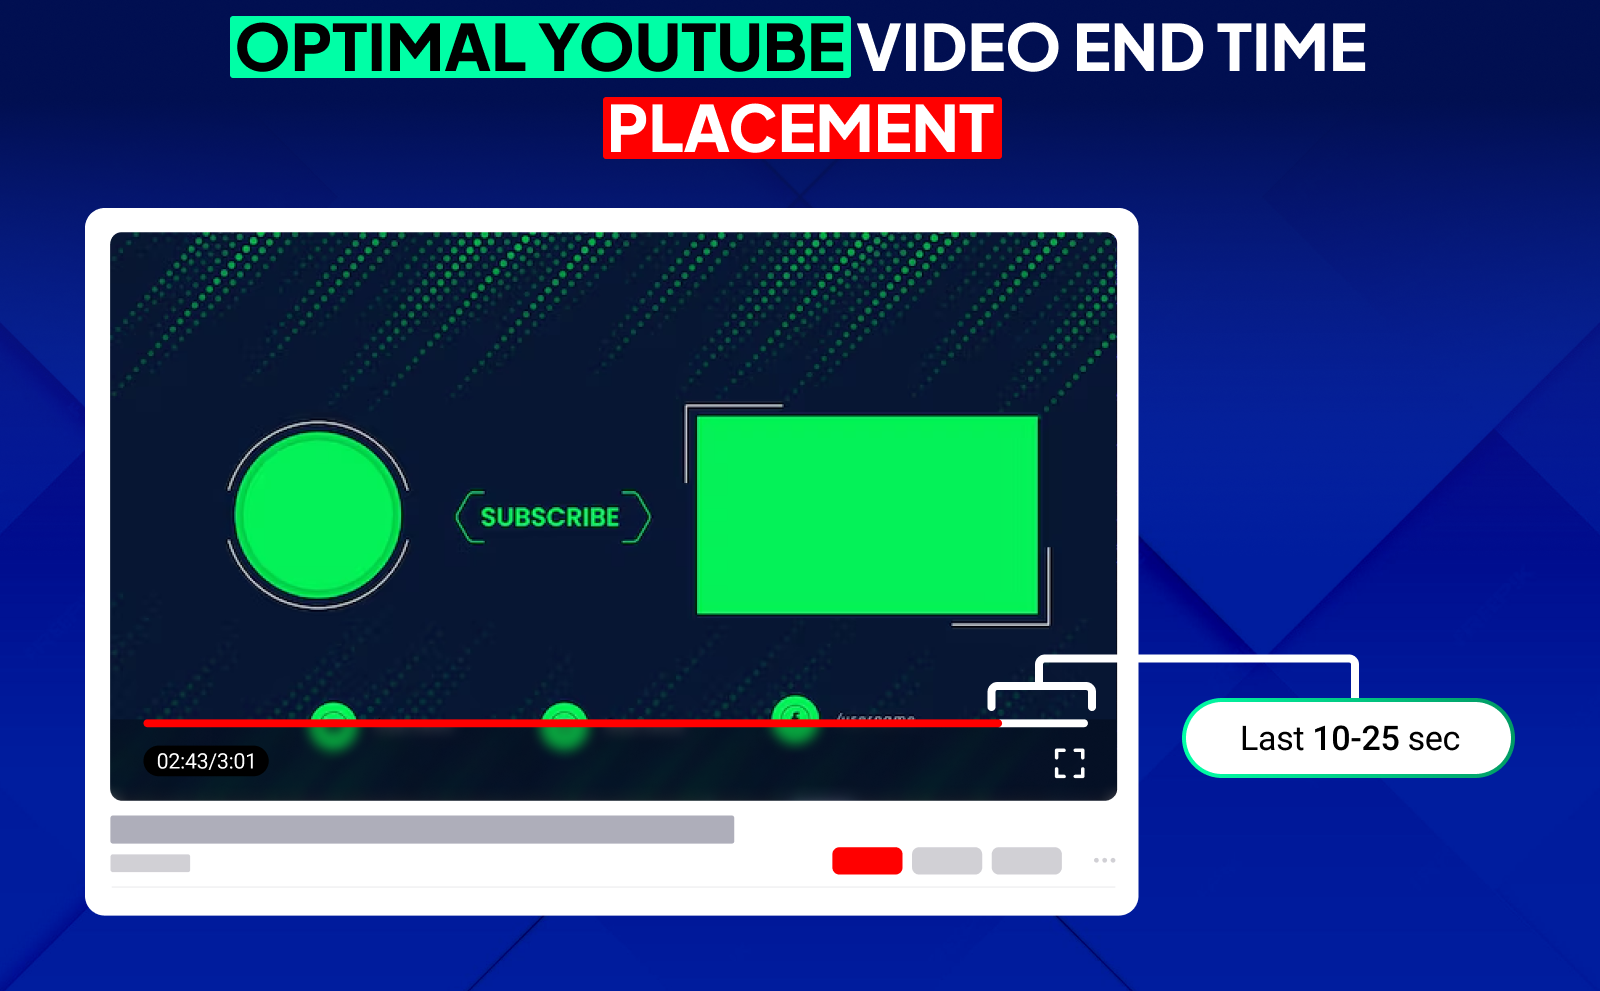
Your video should begin "wrapping up" right around the 15–20 second mark before it ends. That’s when you transition into your outro and leave space for the end-screen elements. You don’t want important visuals or explanations sitting under the clickable boxes because viewers won’t see them clearly. Creating intentional breathing room makes your final moments feel smoother.
A simple way to do this is to design a clean background or a simple shot of you talking directly to the camera. This makes your end screen elements stand out. When your ending is structured this way, viewers feel guided instead of overwhelmed, and YouTube’s algorithm rewards that increased viewer retention.
Essential YouTube End Screen Tips For Better Performance
The most important rule is to be strategic. Don’t just throw elements on your end screen because you have the space. Think about what action matters most: more views? more subscribers? playlist views? Keep your goal focused and build your end screen around that. Simplicity and intention almost always outperform random layouts. Adding to that one of the best ways to optimize YouTube videos, and that is by pairing strong content with an end screen that naturally pushes viewers toward your next best piece of content.
Also, think about viewer behavior. If your end screen feels engaging and flows naturally with the video, people won’t click off. A clear outro, a clean layout, and a friendly verbal cue can make a huge difference. When your end screen feels like a natural extension of the video, viewers are much more likely to stick around.
Choose The Right End Screen Elements
You don’t need to use every element YouTube offers. Pick the ones that support your goal. If you want more watch time, push a related video or playlist. If you’re growing your subscriber base, highlight the subscribe button and make sure it stands out. A focused choice works far better than overwhelming people with four options at once.
Think about where viewers are in their journey. After watching a tutorial, recommending a related “next step” video works perfectly. After a story-style video, pointing them to a playlist keeps them binge-watching. Choosing the right element keeps viewers moving in the direction you want.
Design Clear And Compelling Calls To Action
Your call to action (CTA) should be simple, friendly, and easy to understand. A quick line like “Watch this next,” or “This video explains the next step,” is enough. You don’t need a long speech, you just need to give viewers a reason to click. When your CTA feels natural, people actually listen.
Pairing your CTA with motion or a small visual cue helps even more. A head turn, a hand gesture, or a quick screen pointer directs viewers’ eyes toward the element you want them to click. Small touches like these can increase your end screen performance more than you’d expect.
Match Your End Screens To Your Content Type
Not every video needs the same end screen. Educational videos do well with playlists, entertainment videos do well with a single high-performing recommendation, and story-driven content usually works best with a “watch this next” structure. Matching your end screen to the style of your video helps keep viewers in the right mood.
If your content is fast-paced, keep your end screen energetic. If your content is calm and slow, let the end screen breathe. Consistency matters because viewers get used to your rhythm. When the style matches the content, your end screen feels like part of the experience instead of an add-on.
Keep Your Design Clean And Uncluttered

A clean design always performs better than a crowded one. Leave space around your elements so viewers know exactly where to look. Too many boxes or busy visuals make people click away immediately. Simplicity helps your end screen feel professional and easy to understand.
Use backgrounds or visuals that don’t compete with your clickable elements. A simple gradient, a blurred frame, or even a plain shot of you talking works great. Your layout should make the viewer feel guided, not confused.
YouTube End Screen Examples That Drive Results
Some of the best end screens are extremely simple. one recommended video and one subscribe button. This layout keeps the viewer focused and makes the choice easy. When you reduce friction, your click-through rate usually increases. These layouts work especially well for channels trying to grow fast.
On the other hand, some creators use a playlist-focused end screen that drives longer watch sessions. Playlists are powerful because they keep viewers watching without needing to choose. If your channel relies on tutorials, stories, or educational content, playlists can turn one viewer into a long viewing session.
Successful End Screen Layouts For Growing Subscribers
If your main goal is getting more subscribers, you want to highlight the subscribe button clearly. Put it in a spot that isn’t covered by your face or important visuals. Then pair it with a single strong video recommendation so viewers don’t feel overwhelmed. Giving them just two choices, subscribe or watch more, works incredibly well.
Another trick is to talk directly to the viewer during your outro. Ask them kindly to subscribe and explain why. Even one sentence helps: “If you enjoyed this and want more like it, subscribe. it really helps.” When you sound human, people respond better.
End Screens That Increase Video Views
To boost views, your best tool is a strong “next video” suggestion. Show a video that continues the same topic or solves the next problem your viewer might have. When the recommendation feels perfectly relevant, the viewer doesn’t even think. they just click.
Playlists also work great for this. Instead of promoting a single video, you can drive viewers into a whole sequence of content. This increases your watch time, keeps people on your channel, and makes your videos more likely to be recommended.
Examples Of High Converting External Link End Screens
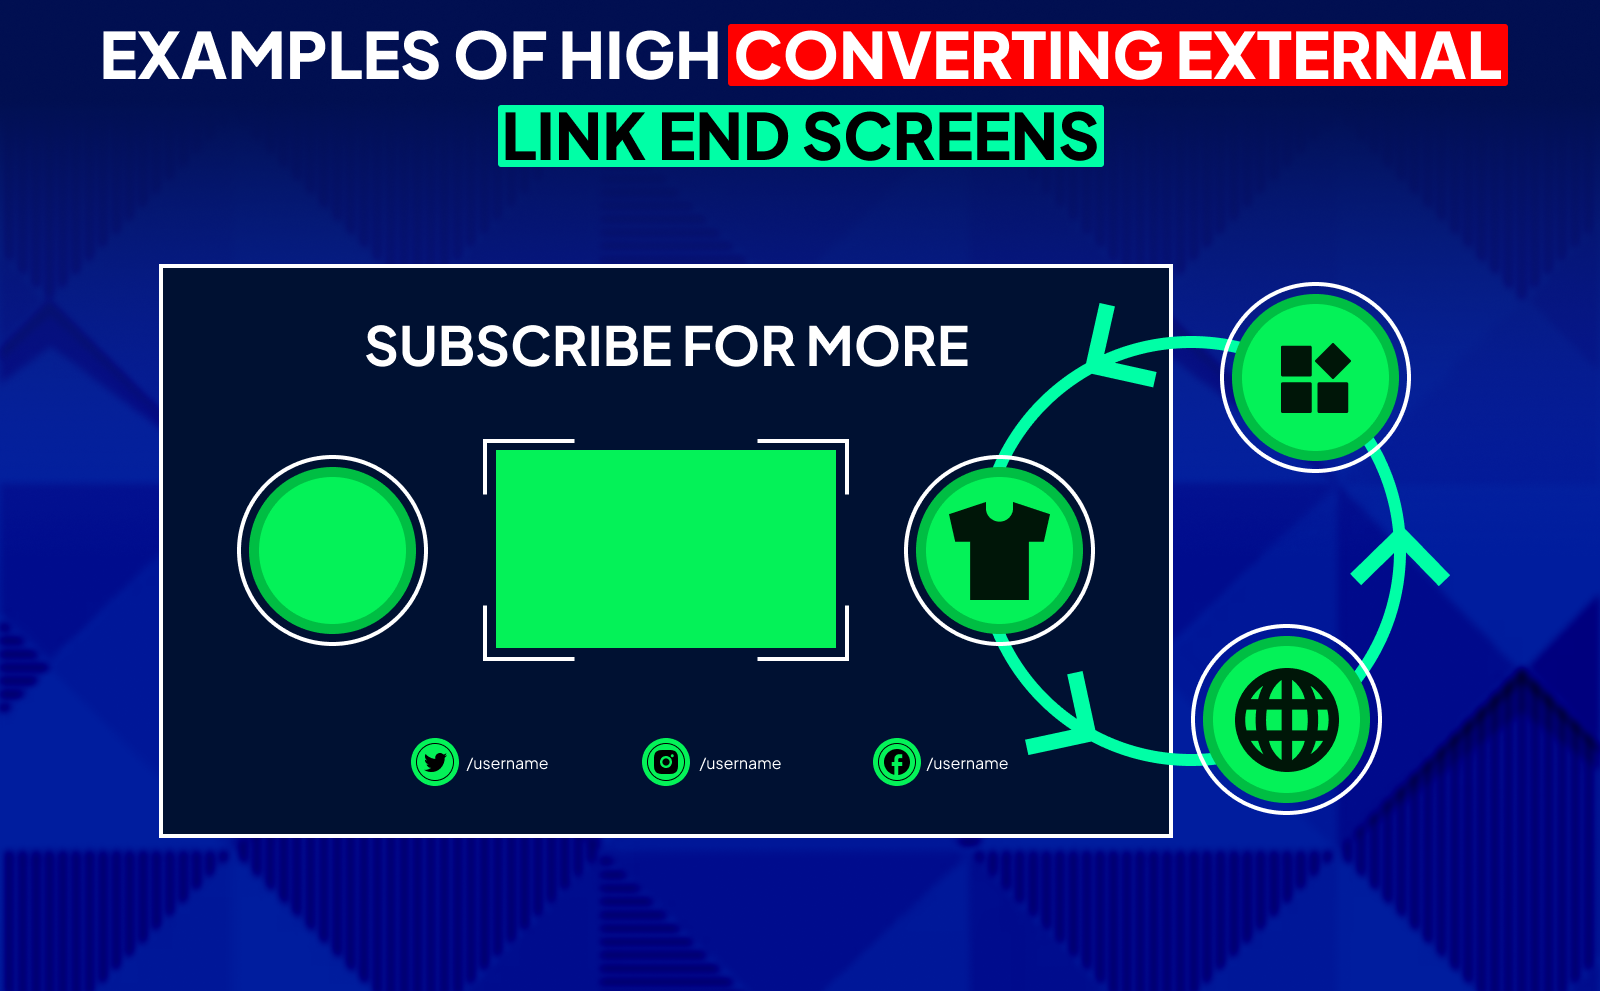
If you have access to external links (through the YouTube Partner Program), keep it simple and direct. Promote one link at a time: your website, your merch, or your product. Too many options confuse viewers. One clear CTA makes the decision easier.
These types of end screens work best when the link relates directly to the video topic. If your video is about equipment, link to your gear page. If it’s about a course or guide, link to that. Relevance is what drives conversions, not fancy visuals.
How To Create And Add YouTube End Screens Step By Step
Creating an end screen is pretty simple. First, upload your video or open one you’ve already uploaded. In YouTube Studio, go to the “Editor” section. Scroll to the bottom until you see the End Screen area. From there, you can add elements like videos, playlists, subscribe buttons, or links.
YouTube gives you a visual layout where you can drag and position every element. After that, choose the timing, adjust the placement, and save your changes. You can preview your end screen to make sure everything lines up correctly before publishing.
Setting Up End Screens In YouTube Studio
Inside the YouTube Studio Editor, you’ll find preset layouts that make things easier. These presets include common setups like “Subscribe + Video” or “Two Video Recommendations.” You can pick one or create your own from scratch. It’s all drag-and-drop, so it’s very beginner-friendly.
Once you choose a layout, you can customize each element. You can select specific videos, or you can choose “Best for Viewer,” which lets YouTube pick the most relevant video for each viewer. This option works surprisingly well for boosting engagement.
Customizing End Screen Templates
YouTube’s templates make things fast, but customizing them gives your end screen personality. You can move elements around to match your background, your branding, or your outro style. Keeping your design consistent across videos helps viewers know what to expect.
You can also change which video shows up in each box. Some creators let YouTube choose, while others pick their highest-converting video. Testing both approaches helps you see what works best for your audience.
Using Design Tools For Custom End Screens
If you want a more polished look, you can use simple design tools like Canva, Photoshop, Figma, or even CapCut. These tools let you create a static background image with clean empty spaces where your end-screen elements will go. It makes everything look professional and intentional.
The trick is leaving enough room for YouTube’s clickable boxes. Your design should guide the viewer’s eyes without competing for attention. These custom templates work well for channels that want consistent branding or a specific visual style.
How NexLev Could Help You 10X Your Engagement Without Doing More Work
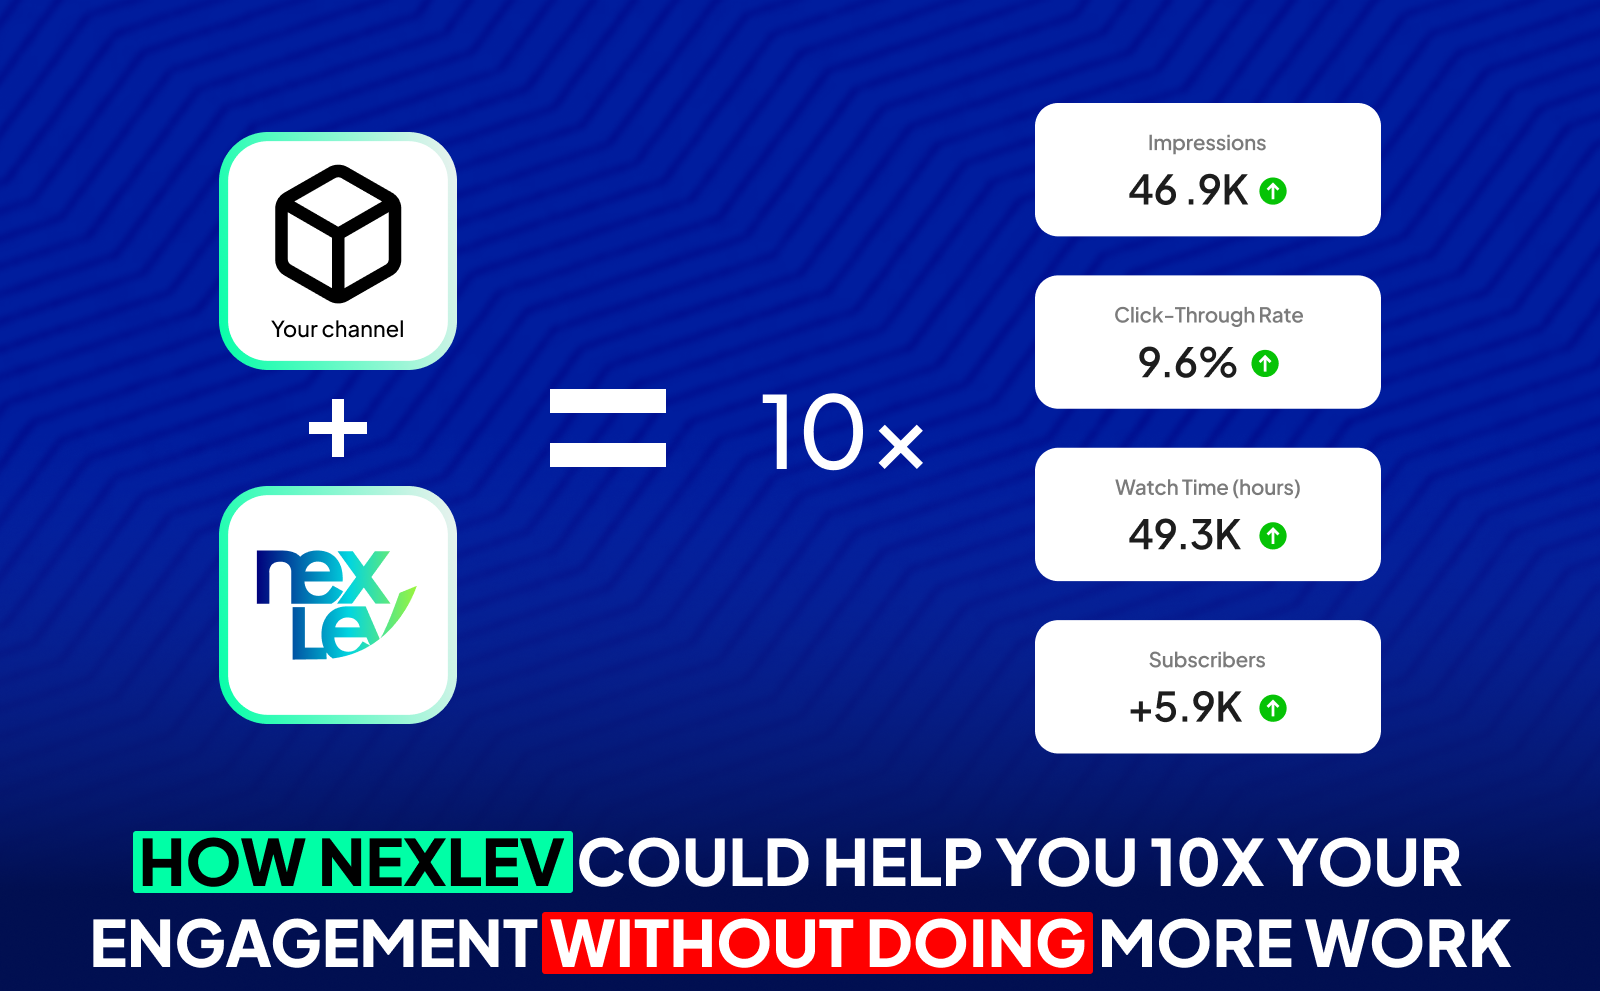
Nexlev gives you the kind of data and insights most creators never even see, which means you can make smarter decisions without spending more time. Instead of guessing which niches will take off or what type of content you should create next, Nexlev shows you real numbers, real patterns, and real opportunities. When you focus on ideas that already have proven demand, your engagement grows naturally because you're creating content people are already searching for.
On top of that, Nexlev helps you think strategically instead of randomly uploading videos. With tools that track competitors, analyze channels, predict RPM, and reveal upcoming trends, you’re operating like a high-level creator. That’s why your engagement increases effortlessly. You’re not posting more; you’re posting smarter. And YouTube rewards creators who use data, not guesswork.
NexLev Niche Finder: The Only Tool You Need To Find Viral Niches
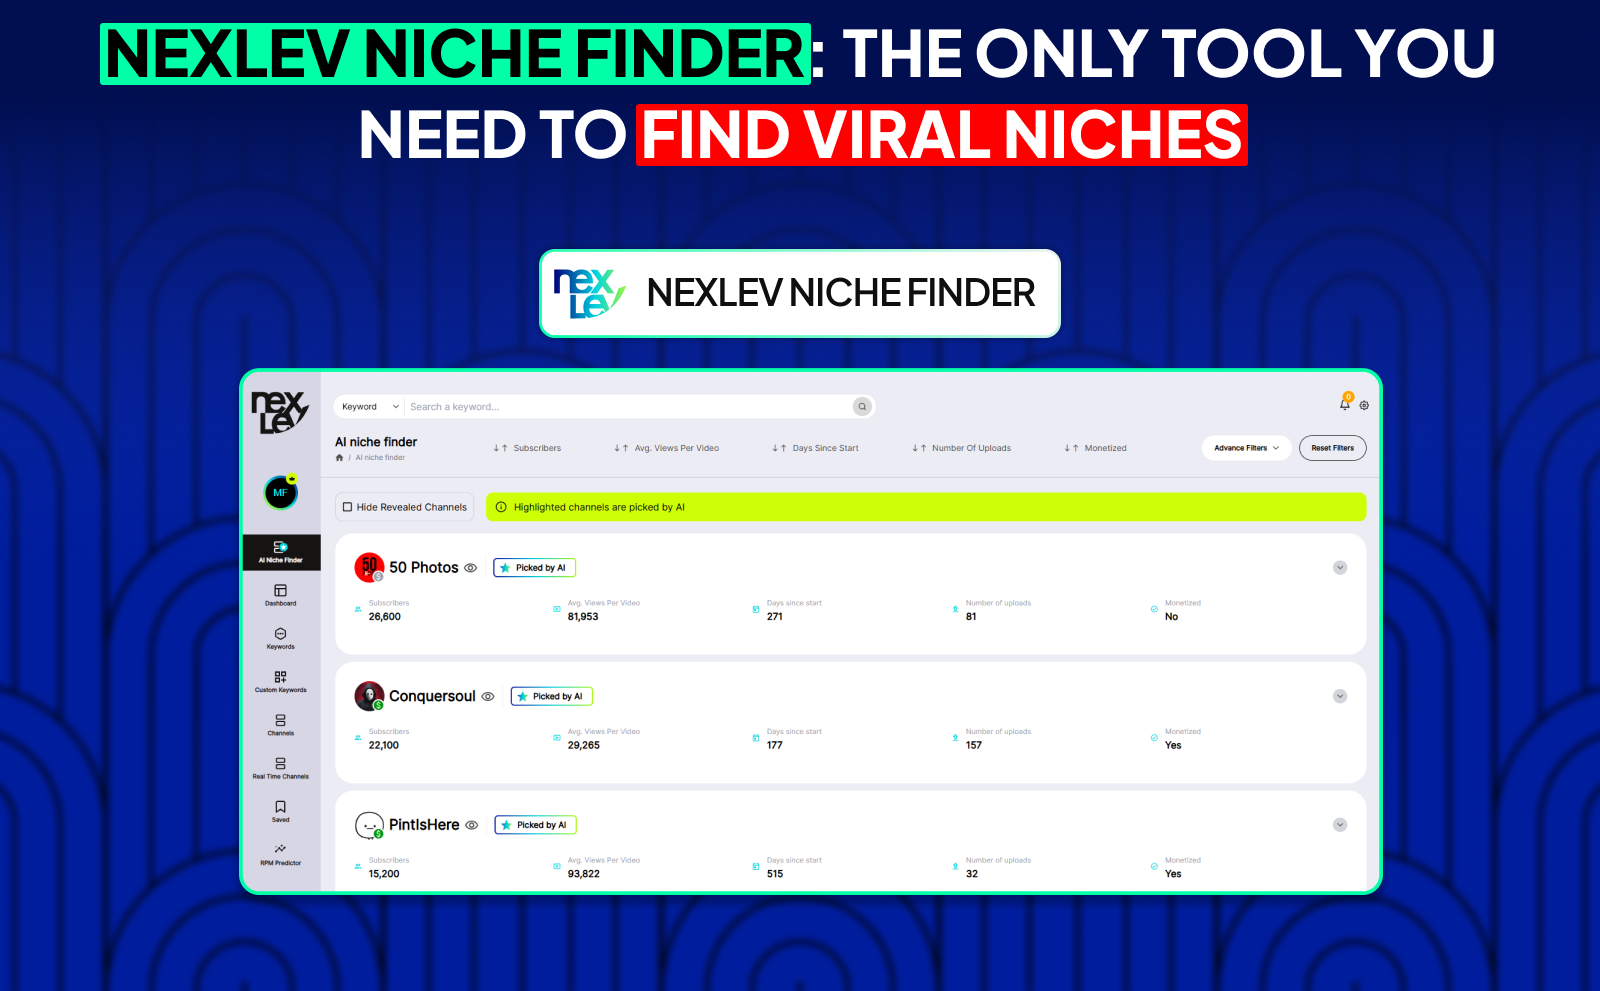
The Nexlev Niche Finder is basically a cheat code for finding YouTube ideas that actually make money. Instead of scrolling for hours or trying to “feel out” trends, you can instantly search through over 200,000 channels, filter them by views, revenue, upload dates, monetization status, or RPM predictions, and see exactly what’s working. It shows you hot niches before they blow up, which means you’re always early to the trend. That alone gives you a huge edge over most people.
What makes it even stronger is the detailed analytics you get for every channel you look at. You can see how much they earn, how often they upload, the engagement they get, and whether their niche is worth entering. Instead of wasting months testing ideas that flop, the Niche Finder points you straight to the niches with demand and money behind them.
The NexLev Extension
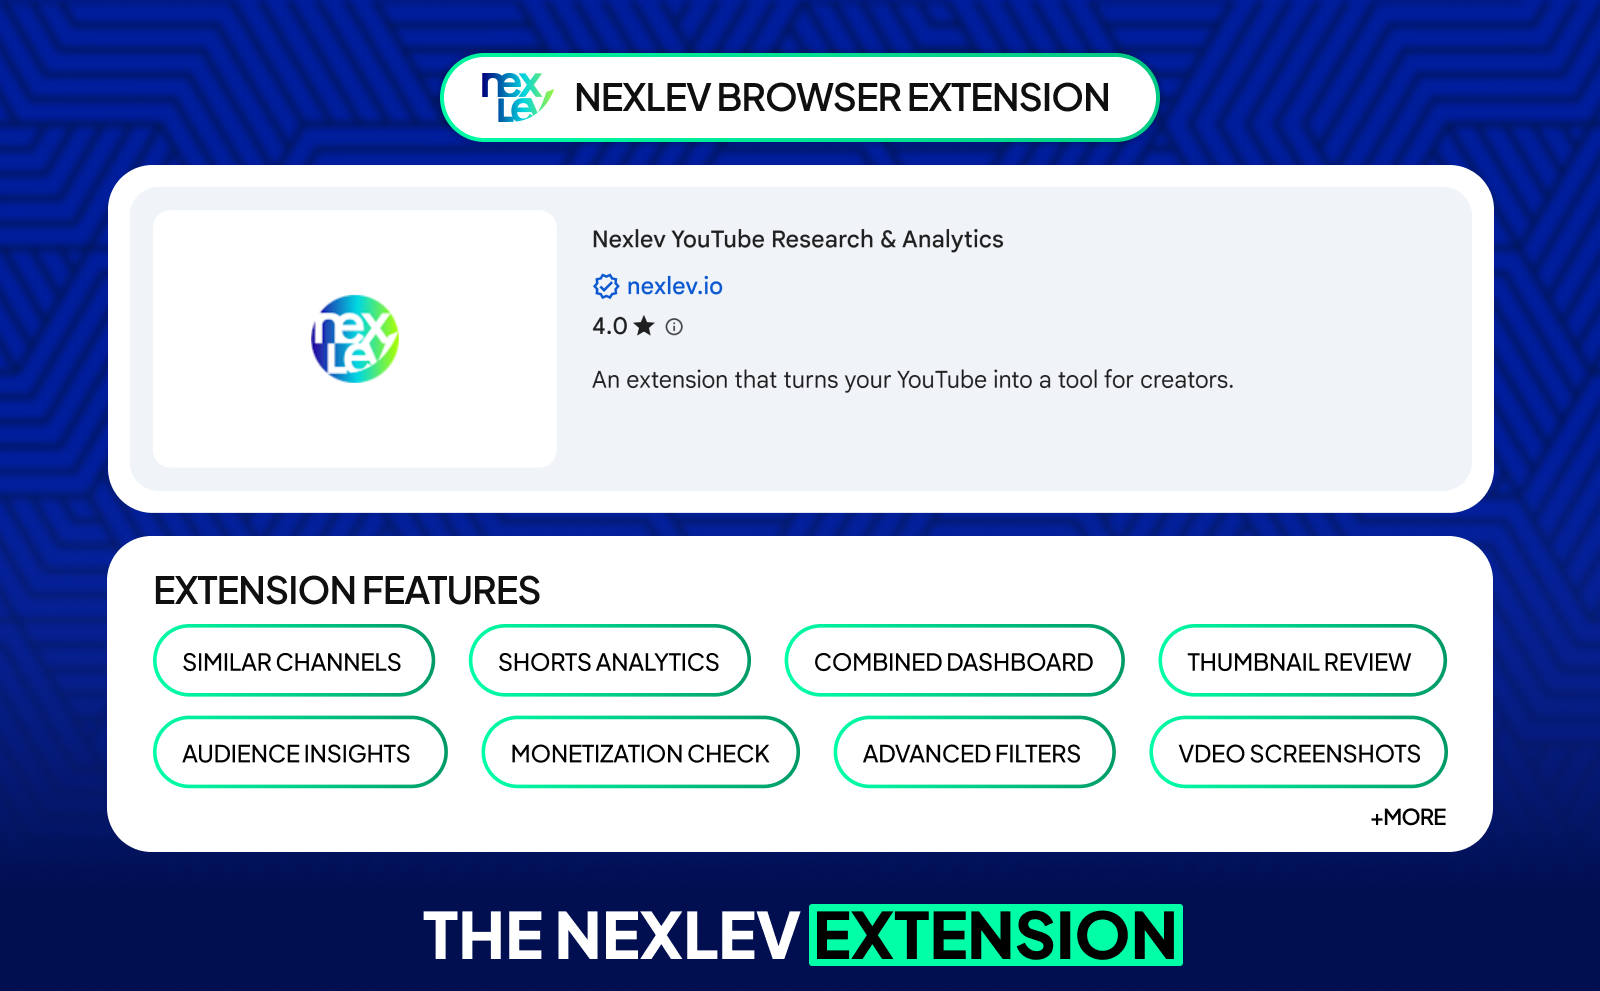
With the Nexlev extension, you can instantly analyze competitor channels, find similar creators in your niche, check performance of Shorts Niches directly inside the Shorts feed, calculate profits, preview thumbnails, and even download thumbnails for inspiration. Everything you need to make smarter content decisions is right there while you browse.
But the real power comes from how much time it saves. Instead of bouncing between different tools and tabs, the extension puts all the data in front of you while you watch YouTube. You can track competitors, study trends, break down audience demographics, and stay two steps ahead without adding more work to your routine. It’s like having a personal YouTube assistant running in the background at all times.
NexLev Faceless Course

If you want to master faceless channels, the Nexlev Faceless Course gives you a full blueprint from someone who has already done it at scale. Noah Morris runs over 20 faceless channels with 2.5 million+ subscribers, and in this course he breaks down exactly how he built them. With over 100 lessons, 20+ modules, and 10+ hours of step-by-step training, it’s one of the most complete guides for anyone looking to turn YouTube into a real business.
What makes it truly valuable is that it doesn't teach theory. It teaches what’s already proven to work. You learn how to pick the right niche, how to build content that grows fast, how to manage a faceless team, and how to scale your channel to six or seven figures. It’s like having a mentor walk you through every step, showing you exactly what to avoid and what to follow. Perfect for both beginners and experienced creators who want to save years of effort.
Best Practices To Optimize Your YouTube End Screens
Optimization is all about small tweaks. Look at which videos people click on, how long they stay, and where they drop off. Every channel is different, so what works for someone else might not work for you. Keep adjusting based on what your analytics tell you.
Think about your viewers’ experience. If your end screen feels natural and helpful, people will use it. If it feels distracting or confusing, they’ll skip it. The little details: pacing, visuals, CTAs, all add up to better performance over time.
Analyze Performance With YouTube Analytics
YouTube Analytics gives you all the data you need. Check the “End Screen” section to see which elements get the most clicks and which ones don’t perform. Look at CTR (click-through rate), average view duration, and where people stop watching your video. These insights show you exactly what to improve. Analytics is one of the most powerful YouTube growth tools, especially when you’re trying to understand how real viewers behave at the end of your videos.
If one video keeps sending traffic to another specific video, that’s a good sign. You can use that pattern to build stronger end screens and create content that naturally connects together. Analytics basically show you what your audience actually wants.
Test Different End Screen Configurations
Experiment with different layouts. one video vs two videos, video + playlist, subscribe button only, and so on. Testing helps you see what your audience reacts to the most. Sometimes a minimal end screen outperforms a more complex one.
And just like YouTube SEO tools help you test different keywords and find what performs best, testing layouts helps you discover which end screen structure drives the most clicks and watch time. Try switching placements too. Some channels get better results with videos on the right side, others on the left. Testing helps you find what feels natural for your style and your viewers’ behavior.
Align End Screens With Your Channel Goals
Your end screen should match what you're trying to achieve. If your goal is watch time, push playlists. If your goal is growth, highlight the subscribe button. If you’re driving traffic off-platform, focus on external links. The clearer your goal, the better your end screen performs.
Make sure your end screen also fits the type of video you’re making. If it’s the first video someone sees from you, push something that introduces them to your best content. If it’s deeper in your niche, guide them to the next step in the journey.
Mobile Vs Desktop End Screen Considerations
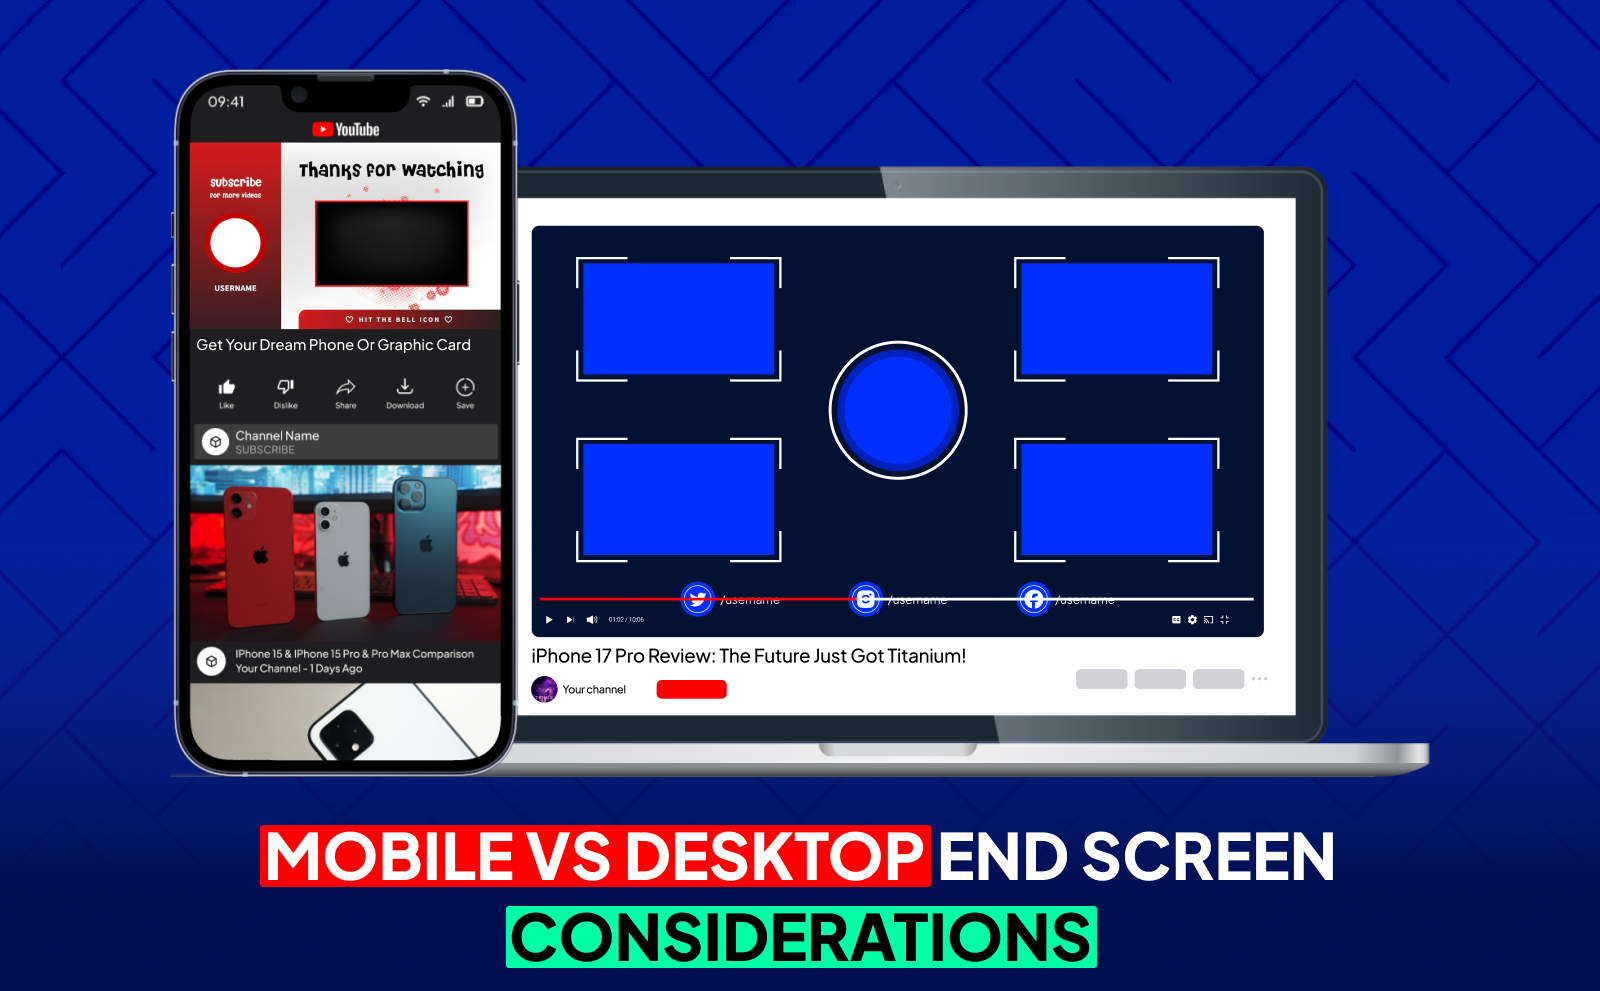
Most viewers watch on mobile now, so your end screens need to be easy to click on small screens. Keep elements spaced out and avoid covering important parts of your video. Mobile watchers tap quickly, so clear positioning helps a lot.
Desktop viewers have more space, but that doesn’t mean you should clutter the screen. A design that works on both devices gives you the best performance overall. When in doubt, prioritize mobile, because that’s where the majority of your audience is.
Common YouTube End Screen Mistakes To Avoid
One of the biggest mistakes is treating the end screen as an afterthought. If your end screen shows up suddenly with no context, viewers will click away. Another common issue is choosing videos that don’t match what someone just watched. Relevance is everything.
Also, don’t forget to speak during your outro. Silences make viewers think the video is over early, which causes drop-offs. A little guidance goes a long way.
Overcrowding Your End Screen With Too Many Elements
Putting four or more elements on your end screen might feel productive, but it usually backfires on you. Too many choices overwhelm viewers and make them click off. Your goal should be to guide them, not bombard them. Keep things simple and focused.
Two elements are usually enough. one recommendation and one subscribe button. A clean layout makes your end screen easier to use and more effective overall.
Poor Timing And Placement Errors
If your end screen covers your face, your text, or important visuals, it instantly feels unprofessional. Same thing if it pops up too early or too late. Timing matters. Leave intentional space in your last few seconds so your end screen fits naturally.
Bad placement also affects mobile viewers more than you think. If elements are too close or overlap, it becomes hard to tap. Clean spacing helps your performance more than fancy graphics ever will.
Ignoring Your Audience Preferences
Every audience behaves differently. What works for a gaming channel might not work for a finance channel. If your analytics show people aren’t clicking your playlist but they click individual videos, switch your layout. Follow the data, not assumptions.
Listening to your audience helps you build end screens that feel natural to them. And when something feels natural, performance always improves.
Conclusion
End screens might look small, but they play a massive role in keeping viewers on your channel, boosting your YouTube watch hours, and guiding people toward your most valuable content. When you use them intentionally, with clean design, clear CTAs, and smart video recommendations, they can power up your growth just as much as any YouTube automation strategy.
At the end of the day, the goal is simple: make it easy for viewers to know what to watch next. A smooth outro, a focused layout, and a viewer-friendly design can turn your last few seconds into one of the strongest parts of your entire video, helping your channel grow faster and more consistently.
Frequently Asked Questions
What Is The Ideal YouTube End Screen Length?
Around 10–15 seconds for the best balance of attention and action.
How Many Elements Can You Add To A YouTube End Screen?
Up to four elements, but using one or two works better.
What’s The Difference Between YouTube End Screens And Cards?
Cards appear during the video; end screens appear at the end.
Can You Add An End Screen To YouTube Shorts?
No, Shorts don’t support end screens right now.
How Do You Measure YouTube End Screen Performance?
Use YouTube Analytics to check CTR, clicks, and viewer retention.
What Are The Best YouTube End Screen Examples For Beginners?
A simple layout with one video + a subscribe button works great.
When Should The End Screen Appear In Your YouTube Video End Time?
In the last 5–20 seconds, ideally after a brief outro.